Equipment Checklist for a New Art & Craft Studio (2026)
By Swathi N ·
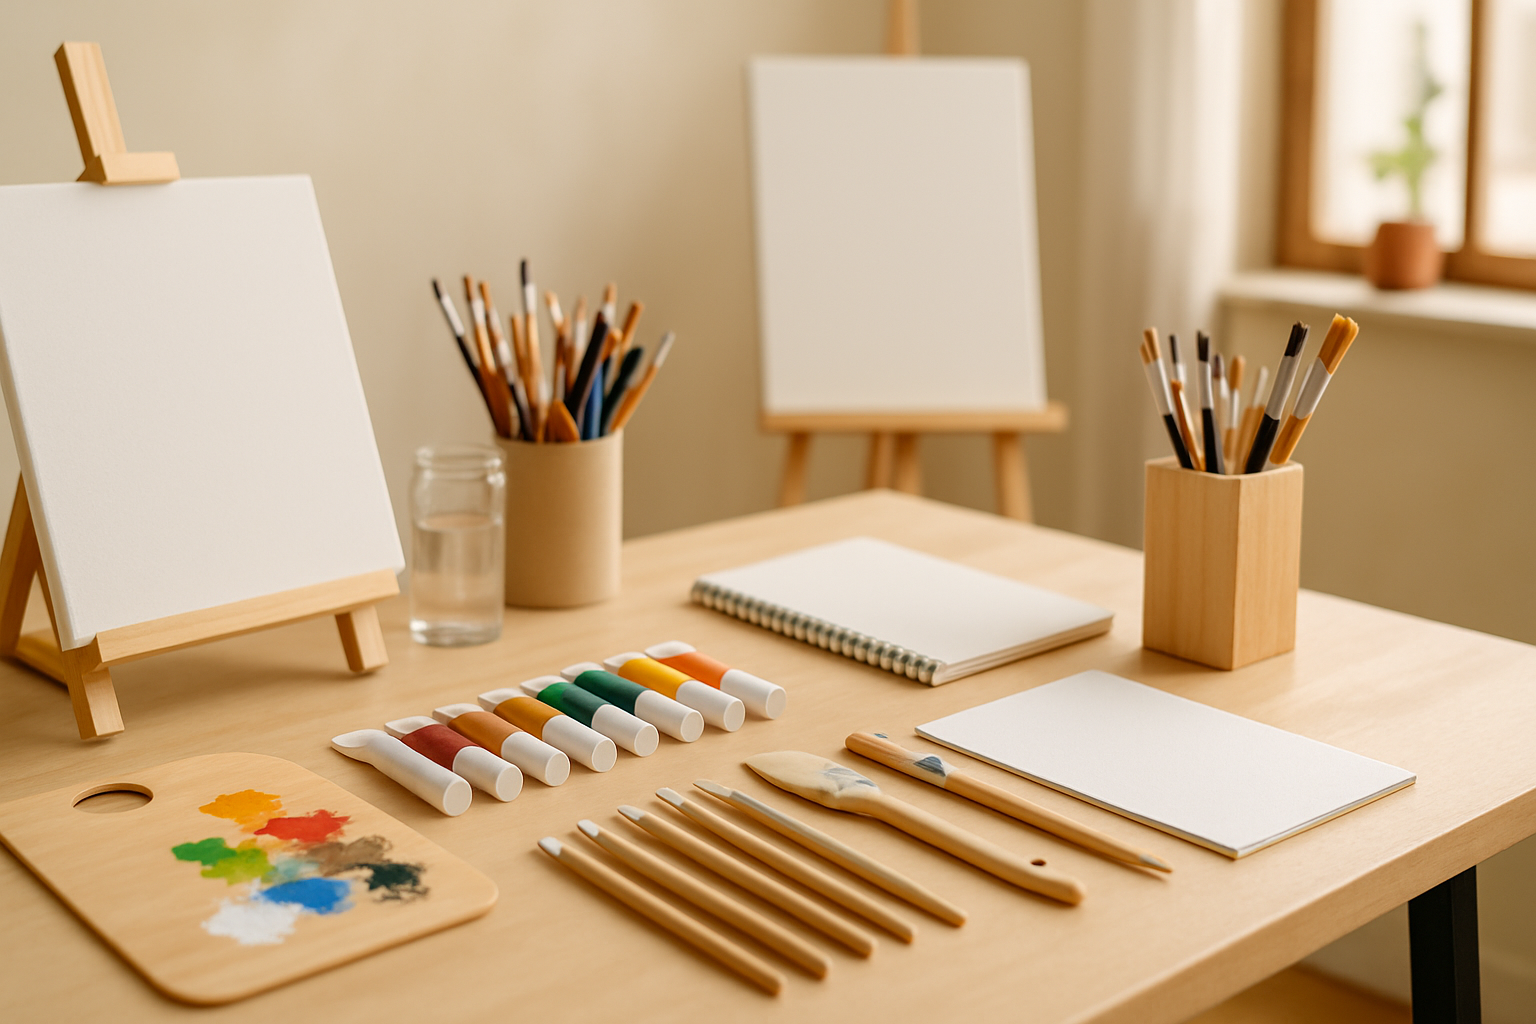
Don't open your new art studio without this kit list. Avoid week-one chaos with the right tools sorted before your first students walk in.
Picture this: it's week two of your new studio, twelve students are waiting, and you're hunting through unmarked boxes for the palette knives you definitely ordered but can't locate. The scissors are somewhere. The gesso might be in the back room. Half your energy — gone, before a single class starts.
That's the setup problem. And it's almost entirely avoidable if you sort the equipment before you open the doors.
2026 is a genuinely crowded moment to launch. Maker spaces, after-school ateliers, weekend hobby studios — they're all chasing the same square footage, the same enrolments, the same students who want to make things with their hands. Standing out starts with running a tight, well-equipped space where nothing goes missing and nothing breaks on day one.
Budget-wise, getting the essentials sorted will cost somewhere between $1,800 and $3,500 (approximately ₹1.5–2.9 lakh), depending on how big you're starting and how much you compromise on quality. That spend breaks into three broad buckets: workspace infrastructure (the bones of the room), consumables storage and dispensing (the systems that keep supplies organised and accessible), and student tools (the stuff that actually goes into hands). Get those three right and you'll spend your time teaching — not retrofitting, not replacing, not apologising.
The 10 Essentials
1. Work Tables (Height-Adjustable or Fixed)
Table height is non-negotiable — and it's the thing most new studio owners get wrong first.
Too low, and students are hunching over their work within twenty minutes. Too high, and the fine motor control goes out the window — brushwork gets shaky, cutting gets imprecise, and everyone's elbows are doing something weird. The sweet spot matters, and it changes depending on who's sitting there.
Height-adjustable tables solve this in one purchase. You're not buying a separate set for the children's programme and another set for adult workshops — one table does both, and that's worth paying a little more for upfront.
Cost range: $80–$220 per table (budget for at least 4–6) | ₹6,500–₹18,000 per table
For budget-conscious setups, the IKEA LINNMON/ADILS combination is hard to beat — fixed height, but solid and dead simple to assemble. If you need portability (rearranging for different class formats, storing tables between sessions), Lifetime's 4-foot commercial folding tables hold up surprisingly well under daily studio use. Both options are based on supplier listings as of May 2026.
2. Seating — Stools or Chairs with Back Support
Here's something that gets overlooked in almost every new studio setup: seating. Not the tables, not the lighting — the chairs. And yet nothing derails a three-hour painting session faster than a seat that's wrong for the work.
Stools are the default in art rooms, and honestly, they've earned that position. They let you shift your weight, lean in, lean back, swivel around to grab something — movements that feel small but matter enormously over a long session. They also tuck under the table completely, which means you're not tripping over chair legs every time someone gets up. If your students are younger, or if you're running detailed close-up work like illustration or embroidery, a low-back stool will serve them better than a full chair (which tends to push the body into the wrong angle for a tabletop workspace).
Budget roughly $25–$60 per stool, or ₹2,000–₹5,000 if you're sourcing in India. IKEA FRANKLIN bar stools are a solid pick — durable, height-adjustable, and they don't look awful. For Indian studios, Nilkamal's plastic stackable stools are the practical choice: easy to clean, easy to stack, and they survive the kind of use art rooms put them through.
One firm rule: don't open with fewer than six to eight seats. Running a class where two students are sharing a stool is exactly as chaotic as it sounds.
3. Storage Units — Cubbies, Shelving, and Flat-File Drawers
Start with the shelving — seriously, do this before you buy a single tube of paint. Map out where the flat-file drawers will sit (those are for paper, canvas, and anything that can't be rolled or folded without damage), where the open cubbies go for paints and brushes, and where the utility racks handle the overflow. Get that infrastructure in place first.
Here's why it matters so much: disorganised supply storage is basically a slow money leak. Materials vanish. Brushes end up crusty in the wrong drawer. Half a class period gets eaten up just looking for the titanium white. None of that is dramatic — it's just the ordinary chaos of a studio that never got its storage sorted, and it compounds fast.
Budget roughly $150–$400 (around ₹12,000–₹33,000) for a full shelving setup. Amazon Basics heavy-duty shelving does the job in the US; in India, Godrej Interio utility racks are the go-to — both are built to industry-standard specs and won't collapse under the weight of 40 bottles of acrylic.
One thing most studio owners figure out too late: open cubbies beat closed cabinets almost every time. When students can see the supplies, they actually use them. Hidden storage means forgotten supplies, which means wasted money.
4. Easels — Tabletop and Standing
Four tabletop easels and two standing floor easels. That's the combination most studios land on — enough to run a drawing or watercolour class without permanently sacrificing half your floor space to equipment nobody's using on a Tuesday afternoon.
Not every class needs them, to be fair. Collage, mixed media, most craft work — you'll be fine without. But the moment you start offering acrylic painting or anything that involves holding a brush at arm's length, your students need somewhere to prop their work. Trying to paint flat on a table is a miserable experience, and they'll tell you so.
For the tabletop units, US Art Supply's wooden easels are the sensible pick for budget-conscious classes — they're sturdy enough, they fold down, and they don't cost a fortune if one gets damaged. Standing work is a different story. The Mabef M-32 folding easel is worth the extra spend here; it holds up under daily use in a way that cheaper floor easels frankly don't.
Budget-wise, you're looking at roughly $20–$90 per easel depending on type (₹1,600–₹7,500), and that spread is wide enough that your choices really do matter. Pricing based on supplier listings as of May 2026.
5. Lighting — Daylight LED Panel Lights or Adjustable Task Lamps
Here's a question worth asking before you buy a single tube light for your studio: what colour is the paint actually going to look like under your lights?
Not a small thing. Standard warm-white room lighting — the kind in most homes and budget studio spaces — shifts how colours read. A student mixes what looks like the perfect muted ochre, takes the canvas home, and suddenly it's muddy yellow. They blame their technique. Nine times out of ten, it's the lighting.
Daylight-spectrum LEDs in the 5000K–6500K range sort this out completely. That's the sweet spot for colour-accurate work — close enough to natural daylight that what you mix is what you actually get.
Cost-wise, you're looking at $40–$120 per panel or lamp (roughly ₹3,200–₹10,000), which is genuinely reasonable for the difference it makes.
For room-wide coverage, Philips daylight LED panels are worth the installation effort. For individual workstations — especially if students are doing detailed illustration or fine linework — the TaoTronics TT-DL13 desk lamp is a solid pick. Both recommendations are based on supplier listings as of May 2026, so pricing may shift, but availability has been consistent.
Don't skip this one to save money early. Bad lighting is the kind of problem that's invisible until it isn't — and by then, students are already frustrated.
6. Drying Racks and Drying Lines
Picture the end of a painting session: fifteen wet canvases, nowhere to put them, and someone inevitably stacking one against another because the table's already full. You know how that ends. Paint transfers, smudged edges, a student who's genuinely upset — and honestly, fair enough.
A dedicated drying rack solves this completely. Vertical swing-arm racks (the kind where each arm folds out independently) are probably the most space-efficient option for a smaller studio. Horizontal wire shelving works too, especially if you've got wall depth to spare. Either way, the point is the same: wet work goes straight onto the rack the moment class wraps up, the table clears, and nobody's hovering anxiously over a damp canvas.
Budget-wise, you're looking at $35–$110 (roughly ₹2,800–₹9,000) depending on size and build quality.
Testrite's vertical racks are the go-to recommendation for studios in the US and UK. But if you're setting up in India — particularly in Bengaluru or Mumbai — it's worth talking to local hardware suppliers about fabricating wire racks to your exact studio dimensions. Cheaper, sturdier, and you're not waiting on international shipping.
7. Supply Cart or Rolling Trolley
Here's the mistake most people make when setting up a new studio: they spend weeks agonising over easels and lighting, then show up to their first class holding a stack of palettes in one arm and a water jar in the other, trying not to trip over a student's bag. No trolley. Classic.
A wheeled supply cart fixes this completely — and it does two jobs at once. During class, it's how brushes, water jars, palettes, and paper actually reach students without you making six separate trips. But flip to demo mode and it rolls right up beside you as a portable station, so you're not stuck at the front table every time you need to show something.
Budget-wise, you're looking at $45–$130 (₹3,600–₹10,800) depending on what you go with.
The IKEA RÅSKOG 3-tier utility cart comes up constantly in studio setups — and honestly, it earns the reputation. Three tiers means one for paper, one for wet supplies, one for everything else. It's available in most major cities, it doesn't cost a fortune, and it won't wobble dramatically across an uneven floor. That last bit matters more than you'd think once a class is in full swing.
8. Sink with Deep Basin (or Portable Wash Station)
No sink? That's a dealbreaker — and if you're signing a lease, sort this out before the ink dries, not after. Acrylic paint, clay slurry, tempera, craft glue — all of it needs to be rinsed immediately, not "in a bit." Let it sit and you're scrubbing hardened mess off surfaces for the next hour.
For rented spaces where you can't touch the plumbing, a portable basin station actually does the job. A large plastic tub on a folding stand with drainage isn't glamorous, but it works. The Rubbermaid heavy-duty utility tub on a folding stand is the go-to here — sturdy enough for daily studio use without rattling apart after three weeks.
What it'll cost you: Portable setup runs $80–$250 (₹6,500–₹20,000). If you're building a permanent studio and can put in actual plumbing, budget an extra $200–$600 (₹16,500–₹50,000) for a stainless steel utility sink — and honestly, it's worth every rupee. Stainless handles the abuse. Plastic eventually doesn't.
9. Whiteboard or Projector for Instruction
Here's something a lot of new studio owners don't think about until day two: where exactly are you supposed to stand when you're explaining a technique to twelve people who can't all crowd around your easel? You need a surface — something the whole room can see.
For most studios, a magnetic whiteboard does the job without any drama. Sketch out a composition, jot down colour ratios, pin up a reference print with a magnet. Done. If your classes lean more digital — video walkthroughs, step-by-step slides, anything screen-based — a projector paired with a pull-down screen starts to make real sense. It's not a luxury at that point. It's just the right tool.
Budget-wise: whiteboards run ₹5,000–₹12,500 (roughly $60–$150 on the US side). A projector setup is a bigger ask — ₹15,000–₹33,000, or $180–$400. Not nothing, but not ruinous either.
Two options worth knowing: the Quartet magnetic whiteboard for most general-use studios in the US market, and the BenQ MS550 projector if you're running a curriculum that genuinely needs consistent projection. Both based on supplier listings current as of May 2026.
10. Basic Consumables Starter Kit — Paints, Brushes, Paper, Adhesives
Start with a two-to-three month supply buffer. That's the baseline. Order before you open, not after you realise you've run out of paper mid-session with twelve students staring at you.
Your starter kit should cover the obvious ground: acrylic and/or watercolour sets, a spread of brush sizes (don't just buy mediums — you'll want fine-tips and wide flats), mixed-weight paper packs, craft scissors, cutting mats, and white glue. Nothing exotic. Just the stuff that disappears fastest.
Buying in bulk drops per-unit cost significantly — which sounds obvious until you're sourcing for twenty students and suddenly the maths really matters.
Cost range: $300–$600 for a full studio starter batch | ₹25,000–₹50,000
For brands: Faber-Castell and Camlin are solid picks for paints and brushes, and they're genuinely easy to source across Tier 1 and Tier 2 cities — no chasing specialty suppliers. US-based studios can lean on Amazon Basics craft bundles to keep costs predictable. (These figures are based on supplier listings as of May 2026.)
Zoom out and the full essentials estimate lands somewhere between $1,800–$3,500 | ₹1.5–₹2.9 lakh — the spread depends on how many tables you're fitting out, whether you have a sink or need to work around one, and your whiteboard-versus-projector call.
One thing worth sorting on day one: admin. If you're handling invoicing and enrolments from the start, a free fee invoice generator takes that off your plate without adding anything to your setup bill.
Recommended Add-Ons
So you've got the basics sorted. Here's where it gets interesting — the add-ons that look optional on paper but end up being the things your students remember.
Ceramics and clay tools deserve a mention first, because the question always comes up. A small tabletop kiln runs $400–$900 (₹33,000–₹75,000), and yes, it's a genuine programme extension — not a gimmick. But don't buy one before the six-month mark. Gauge actual demand first. You might find your students are perfectly happy with air-dry clay and never ask for firing at all.
LED lightboxes, on the other hand, are a no-brainer. $25–$60 each (₹2,000–₹5,000), and students who do botanical illustration, comic art, or tracing transfers go absolutely wild for them. Get three or four. That's enough for most class sizes, and they'll barely dent the budget.
Here's one nobody thinks about until it's too late: apron storage. A wall-mounted hook strip — the kind that costs under $20 — sounds laughably minor until you've burned ten minutes every single session fishing smocks out of a pile and redistributing them to twelve students. Over a term, that's hours. Just put the hooks up.
For portfolio documentation, a basic iPad or mid-range Android tablet covers two things at once — building your studio's social presence and giving students an actual visual record of how far they've come. Photograph finished work at the end of each session. It takes two minutes and pays off in ways that are hard to quantify but very easy to see.
An air purifier is unglamorous. Nobody's excited to budget $80–$200 (₹6,500–₹16,500) for something that just sits in the corner. But acrylic mediums, spray fixatives, certain adhesives — they all off-gas, and in an enclosed studio running classes all day, that accumulates. HEPA filter plus activated carbon. Get it.
Background paper rolls or a pinboard strip along one wall cost almost nothing and do something surprisingly powerful: they turn student work into a rotating gallery. A few metres of kraft paper, some clips, finished pieces going up every week — students notice when their work is on the wall. And so do parents. And so do people walking past.
Optional Gear by Studio Style
Children's Craft Studio (ages 4–12)
Walk into any children's craft session five minutes after it starts and you'll understand immediately why washable markers exist. Paint is on the table. Paint is on a sleeve. Someone has somehow gotten it on their shoe. This is not a problem to solve — it's just the reality, and your equipment list should reflect it.
Skip the fine-art-grade supplies entirely. They're wasted on this age group and frankly too precious to survive it. What you actually need: spill-proof paint cups (non-negotiable), rounded scissors, and washable markers in colours that'll rinse out of a school uniform without drama. Laminated table covers are worth every rupee — don't compromise here.
Designate one corner of the room as the messy zone. A tarp or rubber mat on the floor does the job fine. It gives kids a psychological "anything goes here" space, which is useful, and it saves you forty minutes of floor-cleaning at the end of a session, which is more useful.
Drying racks should sit low — at kid height, not adult height. It sounds like a small thing. It isn't. When children can handle their own finished work without asking for help, they take it seriously. That small bit of ownership matters more than you'd expect.
Teen and Adult Fine Art Studio
The biggest mistake when setting up a teen or adult fine art studio? Skimping on lighting and then wondering why everyone's colour mixing looks off. Adults working in oils or doing detailed illustration work will clock a colour shift under bad lighting almost immediately — it's not subtle, and it's genuinely demoralising when your titanium white dries to something vaguely yellow.
Easel variety matters more than people expect. Don't just buy six of the same model. A mix of H-frame, A-frame, and tabletop easels gives students flexibility depending on what they're working on and how they like to stand (or sit — some illustrators practically hunch over their work).
Two things that get overlooked almost every time: a reference-image library and at least one good magnifying lamp. The library can be printed or tablet-based — doesn't matter much — but having visual references on hand changes how adults engage with a project. And the magnifying lamp? Non-negotiable if anyone's doing jewellery-making or miniature work. You simply can't do that kind of detail without one.
Mixed-Media and Experimental Studio
Fabric scraps, wire offcuts, bottle caps, torn magazine pages — the stuff accumulates faster than you'd expect, and suddenly you've got no room to actually work. That's the core problem with mixed-media setups: the materials themselves demand more storage than a conventional studio ever would. Bins. Lots of them. Deep ones for bulky found objects, shallow trays for flat collage material, and at least a few labelled containers for the weird in-between things that don't fit any category.
Pegboard walls are genuinely one of the better solutions here — cheap, rearrangeable, and they handle the odd-shaped tools (raku hooks, wire cutters, heat guns) that don't sit nicely in a drawer. Reconfigure the whole thing in twenty minutes if you need to.
And a hot glue station isn't optional. Heat-safe mat, dedicated surface, somewhere students aren't going to drag the cord across wet work. Get that sorted early, because it's the kind of thing that causes accidents when it's improvised.
Digital Art and Illustration Studio
Here's the thing about digital studios: you own less stuff, but what you do own costs more and breaks in subtler ways.
Drawing tablets are non-negotiable — a Wacom Intuos or something comparable, ideally one per student rather than shared. Monitor calibration matters more than most beginners expect; colours that look great on an uncalibrated screen can print (or export) completely wrong, so build colour accuracy into your setup from day one, not as an afterthought. And yes, you need a stable internet connection — not just decent, but actually stable — because reference streaming mid-session on a dropping connection is a special kind of frustrating.
Don't go fully paperless, though. Keep traditional materials around for warm-ups and early concept work. Pencil-to-tablet is a genuine pipeline: students who sketch rough ideas by hand first tend to work faster and more confidently once they switch to the screen. A few sketchbooks and a set of decent pencils take up almost no space and pull real weight.
Where to Buy by Region
US
- Amazon US — honestly, for consumables, easels, lighting, and storage, it's hard to beat Prime delivery. Not always the cheapest, but the convenience is real.
- Blick Art Materials (blickart.com) — this is where you actually want to buy paint and brushes, especially if you're ordering in volume. The pricing undercuts Amazon by a noticeable margin, and the range is just better.
- IKEA US — the RÅSKOG cart has become practically a studio cliché at this point, and for good reason. Pair it with a LINNMON tabletop setup and you've got a functional workspace without spending much at all.
UK
- Amazon UK — does the job for most things, same as anywhere else.
- Cass Art — think of it as the UK's answer to Blick. Solid range, decent bulk pricing, and genuinely worth setting up a studio account if you're buying in any real volume.
- For tables and seating, Sweatband is worth a look — as are the usual general office furniture retailers, which often stock exactly what a studio needs at prices that won't sting.
EU
- Amazon DE / Amazon FR — furniture, basics, the unglamorous bulk orders you just need to tick off the list.
- Decathlon — yes, the sports retailer. Sounds odd until you realise their aprons, storage bins, and organisational gear are genuinely solid and dirt cheap. Worth a look before you overspend elsewhere.
- Gerstaecker (Germany) — proper specialist art supply chain. They offer trade accounts for studios, which means better pricing once you're buying at any kind of volume.
India
- The biggest mistake new studio owners make? Ordering everything from Amazon India and wondering why the budget's blown before the first class starts. Crawford Market in Mumbai and Chandni Chowk in Delhi are where you should actually be sourcing bulk paper, fabric, and adhesives — prices are a fraction of what any online listing will quote you.
- For Faber-Castell, Camlin, and Doms supplies that need to ship to wherever you are, Amazon India is perfectly fine — nationwide delivery, reliable enough. But don't treat it as your only option.
- If you're in Chennai, Pune, or Kolkata, track down a Navneet or Camlin dealer directly. Bulk orders through local dealer networks consistently undercut online pricing — sometimes by a surprisingly wide margin.
- Decathlon India is worth a visit for aprons, storage solutions, and the occasional easel. Not glamorous, but practical and well-priced.
- Bengaluru studios have it easier than most — Art Lounge and similar local chains stock both student-grade and mid-range professional supplies under one roof, which saves a lot of sourcing headache early on.
Mistakes New Studios Make
Buying everything in the same grade. Student-grade paint for a kids' class? Absolutely fine. But buying artist-grade for every adult session inflates your costs fast — and using it in children's classes is just burning money for zero pedagogical gain. The material should match the level of the programme. Full stop.
Underestimating how many tables you actually need. This one bites almost every new studio. You plan for four students, you buy four tables, and then eight people show up on enrolment day. Tables aren't something you can improvise or borrow from a storeroom mid-session. Get one or two more than your headcount tells you to.
Leaving ventilation for later. One spray fixative in a closed room — fine, probably. But run that same room through six classes a week and use the fixative three times in each, and you've got a genuine health problem on your hands. Sort the ventilation or get an air purifier in place before you open, not after a parent calls to complain.
Going cheap on easels. A $15 easel seems like a reasonable call until it folds mid-class under a wet canvas. Budget easels aren't built for repeated daily use by students — the joints loosen, the supports buckle, and they fail faster than you'd expect. You don't need professional-grade. You just need stable, which means mid-tier.
No admin system in place from day one. Everyone obsesses over equipment in the planning phase — understandably — but the backend infrastructure matters just as much. Paper rosters and spreadsheets work fine up to a point, and that point is roughly 30–40 students. After that, things start slipping through the cracks: missed payments, double-booked slots, attendance gaps nobody noticed. Have a look at Best Coaching Management Software For Academies (2026) before you hit that wall — migrating from a broken system mid-growth is a headache you genuinely don't want.
Frequently Asked Questions
How much should I budget for equipment before opening an art studio?
Start with a hard number: for 10–20 students across mixed-age groups, you're looking at $1,800–$3,500 (roughly ₹1.5–₹2.9 lakh) for core equipment and furniture. That's your baseline. Tables, easels, storage, seating — the things that don't disappear after the first term.
Consumables are a separate conversation entirely. Paint, paper, adhesives — these burn through fast, and how fast depends entirely on how often you're running classes. Don't fold them into your equipment budget or you'll spend the first month confused about where the money went.
For consumables, a six-month buffer of $400–$600 gives you breathing room without over-committing before you know your actual usage patterns. Most new studio owners underestimate this figure. Build the buffer first, track what you actually use, then adjust.
Do I need professional-grade art supplies for a teaching studio?
It depends — and the answer changes pretty dramatically based on what you're actually teaching. For kids' sessions or beginner adult workshops, student-grade supplies work perfectly fine. Faber-Castell, Camlin, that whole tier — totally adequate. Nobody needs professional sable brushes when they're still figuring out how to hold one.
But the moment colour mixing enters the picture (painting classes, basically anything where students need to trust what they see on the palette), or you're running archival work like illustration or printmaking, cheap supplies start actively getting in the way. One step up from student-grade — not professional, just mid-range — and the difference in results is pretty hard to ignore.
What's the minimum space needed to run a functional art studio?
How much room do you actually need? Honestly, less than most people assume — but there's a floor below which things get genuinely unworkable.
For a class of 8–10 students, somewhere between 400 and 600 sq ft is the sweet spot. That gives you enough room for tables, a supply station, and dedicated drying space without everyone bumping into each other. Drop below 400 sq ft and you'll feel it immediately — wet work sitting out to dry plus students moving around equals a circulation nightmare. It's not just uncomfortable; it's a safety issue.
Tight on space? Stackable furniture and wall-mounted storage can do a surprising amount of heavy lifting. You'd be amazed how much functional room you can recover just by getting things off the floor and onto walls.
Related reading: Equipment Checklist for a New Gym & Fitness Studio (2026) — worth a look if you're planning a multi-use space or just want to compare fit-out approaches across different studio types.
> Ready to manage your studio from day one? Handle enrolments, track attendance, send invoices, and issue certificates — all in one place. Start your free trial of Lynk and spend less time on admin. > > Also useful: a free certificate generator for student completions and course milestones — no design skills needed.